In this article, we are going to discuss the connector with no arrow on it. We will set no arrows in Microsoft Visio. I am using Visio 2011 version. If you are using only an older version then you can go with it or if you are using 2016, 2019 and these are slightly similar to each other.
Let's Get Started:
After selecting it our shapes will be inserted into it as we can see in the following result.
Now we will right-click on the connector then it will show some options then we will go with Edit Master > Edit Master Shapes.
The first step is to open Visio after that we will proceed with the further steps.
Then we will open the Basic Shapes in Shapes pane as we can see in the following screenshot.
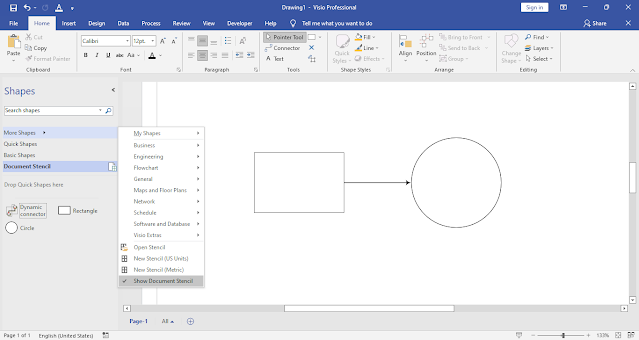
As we can see that our basic shapes appear on the left-hand side in Visio. Now, I am going to insert some shapes on the artboard in Visio. Then connect them with the help of the connector then you will see that arrow will be inserted with the connector.
As we can see that arrows are included with the connector. Now we are going to remove the arrow in Visio.
For this go to the More Shapes > Show Document Stencil. After clicking on the Show document then the shapes that we have used in the recent document will appear in the shape pane. As you can see.
After selecting the Edit Master Shapes then we will see that the settings of the Connector will be open.
Then go to the line then a drop-down menu will be open then go to the More Arrows.
After clicking on the More Lines then a window will be open on the right-hand side as we can see in the following result.
On the left side, we can see the End Arrow Type.
We will expand it then we will see the following result. There are many types of the arrow in it and for now, there is no eight arrow type is selected.
Then we will select the first option none then we will see that our arrow will be removed from the connector setting as we can see in the following result.
As we can see that there is no arrow in the Edit Master Shapes then we will move forward to save the setting.
Now we will close the window then it will show the save option as we can see the result in the bellow.
Say "Yes" then the setting that we have performed will be saved as we can see in the following result.
Then we will move toward the first set that we have done early on in this article as we can see in the following result.
As we can see that all setting is done now if you will select the connecter and then connect the shapes then these connector does not contain the arrow in Visio.
In this way, we can set the Visio default connector with no arrow.


Comments
Post a Comment
If you require any help related to Microsoft Visio 2019 then let me know. I am available 24/7 to assist you. It's my pleasure to solve your issue.